Departments may submit vouchers and supporting documents to be imaged:
- for payment processing
- if those documents have reached final approval in the department
- if those documents are not required to be imaged but the departments wish to retain them in the Image Retrieval System (IRS)
Prepare Voucher Documents
All voucher documents are submitted as a PDF that consists of one cover sheet plus any supporting documentation.
NOTE: Imaging and Documentation Services (IDS) requires electronic submission of all vouchers, unless a business exception is approved. Please contact IDS to discuss your business justification before submitting paper documents.
Name Your File with the Doc ID
Save the PDF with the Doc ID as the file name. The file name should look like [DocID].pdf (e.g., J0VP2123456.pdf). Do not include additional information such as a vendor name.
Download and Attach Cover Sheet
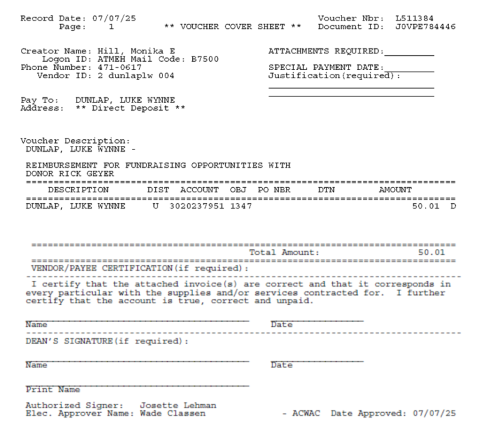
All documents must have a *DEFINE cover sheet. The cover sheet, also known as the Voucher Transmittal Form (VTF), contains information that determines how a document will be categorized, imaged, and retained. The VTF must be submitted as a grayscale (black and white) PDF.


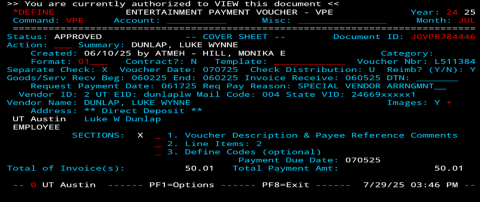
While there are multiple options to print your cover sheets, it is recommended that you print from *DEFINE to Green Output. Refer to Print a *DEFINE Screen to Green Output. Do not use a screenshot or screen print of *DEFINE. See figure 1 for an example of a correct cover sheet and figure 2 for an example of an incorrect screenshot.
These instructions support creating PDF documents that are compatible with the KTA enterprise image capture software. Submitting documents incompatible with the image capture software can cause significant delays in processing your payment.
Combine Cover Sheet and Supporting Documentation
There can be only one cover sheet (VTF) per document to be imaged. If the supporting documentation for a voucher is comprised of other vouchers containing cover sheets, you must draw a heavy line through the text and Doc ID at the top of the page. (Click here for an example of how to mark through a Doc ID.) In addition, “BACKUP” may be written on each supporting VTF.
If a voucher intended as supporting is not properly marked, the imaging software will automatically separate the supporting voucher into a separate document, rendering your document incomplete.
Once you have created the PDF cover sheet, you then add receipts, authorizations, and other supporting documentation required to process the voucher for payment. The documentation may be in paper or digital form, but the documentation will need to be converted to PDF. Your final PDF must meet the requirements below.
PDF Requirements
- PDFs should not exceed 250 pages
- PDFs should not exceed 25MB
- The layout for all pages of the PDF should be set to portrait (vertical), not landscape (horizontal)
- PDF scans should be “clean”
- Not too dark
- Not too light
- Legible
- Not blurry
- For more details, review PDF Quality
PDFs must be submitted as grayscale (black and white). If supporting documentation, such as receipts, are in color, the documentation must be converted to grayscale (black and white) by re-printing the documents using the Adobe Acrobat printer function. For detailed instructions, see Preparing PDFs for Upload to Box.
For assistance with combining PDFs for uploading to Box, please see the following pages:
Upload Your PDF to Box
Vouchers must be submitted to the correct upload folder in Box, and you must have permission to access the Box folders. To request access, please use the IDS - Upload Folder Request form: https://forms.office.com/r/qdgTrZufxm. If, after filling out the form, you still have questions, please contact IDS.
There are two primary UT Box folders that IDS manages for uploading documents:
- UPLOAD - Payment Processing
- Used for documents submitted to be final approved and to be processed for payment
- UPLOAD - Final Approved
- Used for documents that have already been final approved at the department level and do not require payment processing
CAUTION: Please upload all document(s) to the correct UPLOAD folder. Uploading to the incorrect folder interrupts IDS and Payment Services workflows and will cause delays in document processing.
If you require rush payment processing, please review Rushing a Payment Document.
Check the IRS for Your Uploaded Documents
Departments are required to retain a departmental copy of the uploaded vouchers in case they need to be resubmitted for any reason. Departments must keep that copy until they have verified that the vouchers have been final approved or released to the IRS.
Verify Images Submitted for Payment Processing
- Departments must retain copies of all documentation submitted for payment processing until the voucher status is marked APPROVED in *DEFINE.
- Once the voucher status becomes APPROVED, the digital voucher in *DEFINE becomes the master record. You may then destroy or retain the department copy as a convenience copy.
Verify Images Submitted after Final Approval or as a Special Project
- Departments must retain the original hardcopy or digital files as submitted until they have viewed and verified the image in the IRS.
- The image will generally be available within 7 working days of submission.
- The department must verify that the image contains all of the information submitted from the original hardcopy or digital file.
- Contact IDS if the file is incomplete, incorrect, illegible, or the file never appears in the IRS.
- Once you have verified that the image of your documentation is complete and accurate in the IRS, the IRS copy becomes the master record. You may then destroy or retain the department copy as a convenience copy.
Contact IDS
- Address:
-
Imaging and Documentation Services
110 Inner Campus Drive
Campus Mail Code: K5400
Austin, Texas 78712
- Phone:
